Speculum Retractor Problems
The speculum does not fit over dilator.
Open the speculum slightly and lower it over a 10mm dilator.
The speculum does not fit into the incision.

Make sure that:

  1. skin incision is at least 2.5 cm in length,
  2. fascial incision is extended beyond the limits of the skin incision,
  3. adequate finger dissection is performed before speculum insertion.
The speculum’s flared lips get caught on the skin and soft tissues during insertion.
Speculum handle should point cranially or caudally during insertion to help clear skin and soft tissues.  When the speculum reaches the depth of the wound, the handle is turned 90 degrees to medial or lateral orientation before the blades are opened.
Muscle (not bone) in visualized at the depth of the wound as the speculum is opened.
This is normal.  The speculum is used to expose the musculo-tendinous attachments to the bone.  These are then bipolar coagulated, divided with scissors and swept away from the bone.
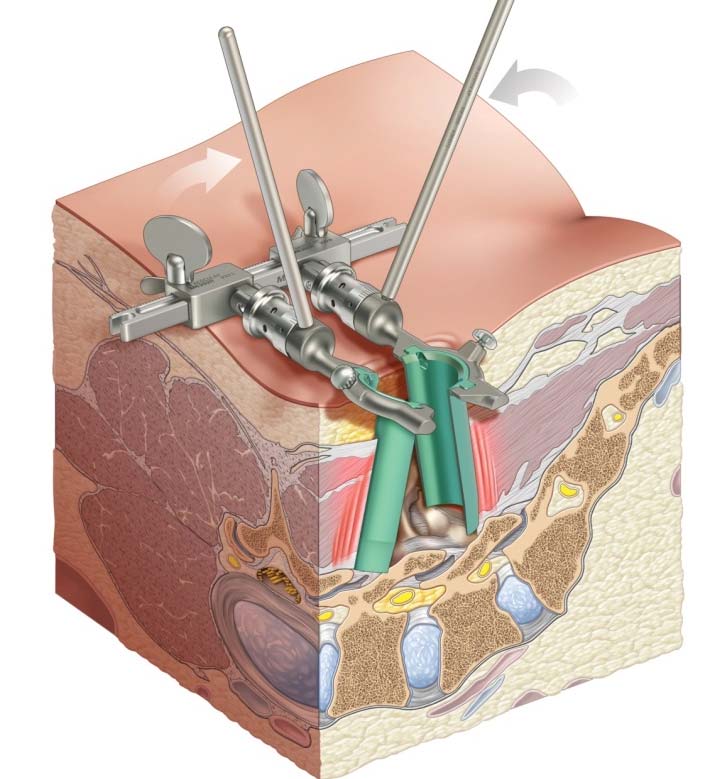
The speculum does not open far enough cranio-caudally to get pedicle-to-pedicle exposure.
This is normal.  Because the speculum blades do not flare, it will not be possible to get a pedicle-to-pedicle exposure with this device through a small incision.  That will be achieved later by the Spyder cranio-caudal blades. 
Medial-lateral exposure is inadequate with the speculum.
This is normal.  The speculum is primarily used to obtain cranio-caudal exposure spanning the facet joint.  Additional medial-lateral dissection can be performed after the cranio-caudal Spyder blades have been inserted.
The speculum is unstable in the wound.

This may occur if the patient is too thin.
Solutions:

  1. Hold the speculum with one hand as you dissect with the other hand.
  2. In very thin patients, the speculum is not needed, since the facet joint will be quite superficial.  Just use a Gelpi to hold the fascia open.
Notes and Bail-Out Strategies


Spyder Cranio-Caudal Retractor Problems
The tubular blades do not “hug” the dilator.
  1. Select appropriate dilator for blade size.
  2. Make sure retractor is completely closed.
  3. Make sure the blades are not flared.
The tubular blades do not fit into the incision.
  1. Incision should be at least 2.5 cm in length for smallest (16.5 mm) blades.  Consider extending the incision to fit larger blades or use smaller blades to fit into smaller incision.
  2. Make sure retractor is completely closed.
  3. Make sure the blades are not flared.


The retractor encounters resistance and does not open adequately.

Causes and Solutions:

  1. Limited by the skin incision: Not a problem. Only 5-6 mm of retractor opening is needed in a small incision.  The rest of the exposure will be obtained by flaring of the blades.
  2. Limited by the fascial incision: Extend fascial incision well above and below the limits of skin incision.
  3. Limited by bone:
    1. Use shorter blades to avoid getting caught between adjacent hypertrophic facet joints.
    2. Move the retractor slightly out of the wound, open the blades to clear facet joints and re-insert.
The retractor encounters resistance and does not flare adequately.  One or both blades cannot be tilted.  In extreme cases, the blades are forced out of the retractor.

Causes and Solutions:

  1. Limited by the fascial incision: Extend fascial incision well above and below the limits of skin incision.
  2. Limited by bone:
    1. Use shorter blades to avoid getting caught between adjacent hypertrophic facet joints.
    2. Use unequal sized blades if the problem is only caudal or cranial.  At L5-S1, a shorter caudal blade works well.
    3. Move the retractor slightly out of the wound, flare the blades to clear facet joints, and re-insert.
The retractor sits proud of the skin surface after it is opened and flared.

Causes and Solutions:

  1. One or both blades are too long: Use shorter blades. Consider unequal sized blades, especially at L5-S1, where the caudal blade can be shorter.
  2. The blades haven’t cleared the hypertrophic facet joints and are sitting on top of the joints: Flare the blades more to clear the facet joints and then insert them deeper.
There is muscle at the depth of the exposure, obscuring boney anatomy.
  1. If there is a large amount of muscle, inadequate pre-dissection has been performed.  Return to the pre-dissection step.
  2. A small amount of muscle attached to the bone along the perimeter of the exposure is a normal finding.  This is coagulated and detached from the bone.  The blades and unflared and re-flared to sweep the newly detached muscle out of the field of view.
  3. As a shortcut, a small amount of muscle can be resected to obtain the necessary exposure.
The exposed boney anatomy is confusing to the surgeon.  The location of the facet joint and pedicles cannot be deciphered.

Use lateral fluoroscopy to determine the location of the anatomical landmarks in relation to the cranial and caudal blades.

The exposure is centered too cranially or caudally.
  1. Pay attention to determination of exact pedicle locations by fluoroscopy before making the skin incision.
  2. Un-tilt one blade and over-tilt the other blade.
  3. Use a table attachment arm to re-center and stabilize the retractor.
  4. Attach a blade insertion handle to one of the blades and have an assistant dynamically re-center and stabilize the retractor during the case.
  5. Consider extending the incision.
During screw insertion, the caudal pedicle is easily accessed but the cranial pedicle is slightly beyond reach.
  1. Make sure an adequate fascial incision has been made cranially.
  2. Flare the cranial blade more cranially.
  3. Have the assistant move (translate) and hold the entire retractor complex slightly in a cranial direction.
  4. Tilt the entire retractor complex cranially, using blade insertion handles or table attachment arm.
  5. Consider extending the skin incision.
The retractor is too loose and unstable within the wound.

Causes and Solutions:

  • The incision is too long: Use larger diameter tubular blades and open the retractor blades more.
  • The retractor is sitting proud of the incision and is not sufficiently buried to be stabilized by the soft tissues: See previous section re correction of a proud-sitting retractor.
Notes and Bail-out Strategies


Spyder Medial-Lateral Retractor Problems
The medial-lateral retractor blades do not fit within the cranio-caudal retractor.
  1. Open the cranial-caudal retractor more.
  2. Use thinner medial-lateral blades.
The medial-lateral retractor does not sit properly over the cranial-caudal retractor.


The upper and lower retractor frames are different.  Make sure that the lower retractor frame is used for the cranio-caudal blades and the upper frame for the medial-lateral blades.


The medial-lateral blades cannot be opened or flared sufficiently.

Causes and Solutions:

  1. Limited by cranio-caudal blade edges:
    1. Open the cranio-caudal blades more.
    2. Use the thin pink blades or delta blades which require only 5-6 mm of separation between cranio-caudal blades.
  2. Limited by bone: The medial blade may be hitting the slope of the lamina.  Use a shorter medial blade.
  3. Limited by muscle:  The medial blade may be limited by the muscle mass trapped between it and the spinous process.  Perform a more extensive medial pre-dissection or resect some of this muscle.
The exposure is centered too laterally.  Medial exposure is inadequate for access to the lamina and lateral recess.

Causes and Solutions:

  1. Skin incision was made too laterally: The skin incision should have been made in the plane of the pedicles, not lateral to them as advocated in percutaneous techniques.  If it is expected that more than usual medial exposure is required for decompression, the skin incision can be planned along the medial edge of the pedicles based on AP fluoroscopy.  See below for solutions.
  2. Finger dissection was carried out too laterally: Do not follow the cleavage plane between the multifidus and longissimus muscles. Finger dissection must be carried out within the multifidus muscle mass.
  3. Solutions:
    1. Remove retractors.  Establish a more medial plane of dissection within multifidus, and reinsert retractors. (cumbersome)
    2. Resect some of the medial muscle mass.
    3. Tilt the entire retractor complex medially, using a table attachment arm or a blade inserter as a handle.
The retractor is centered too medially. Lateral exposure is inadequate for access to the pedicles.

  • Use table attachment arm to center the retractor more laterally.
  • Resect some of the lateral muscle mass.
  • Use a wider lateral blade and open/flare the retractor more.  This may require extension of skin and fascial incisions and a more thorough lateral pre-dissection.

Lateral exposure is sufficient for access to the pedicles but not to the transverse processes.


Remove the medial-lateral retractor and use a hand-held retractor (e.g. Delta blade on a blade inserter).

Notes and Bail-Out Strategies